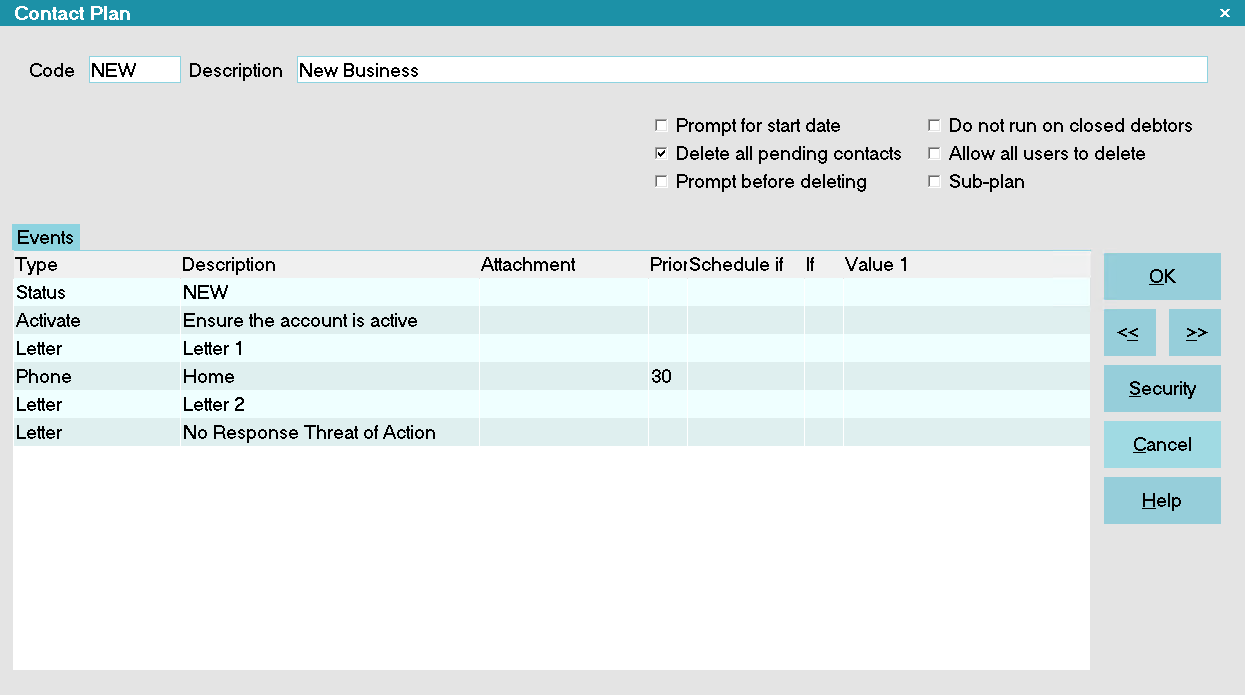
Contact Plan
The Contact Plan form is used to create an automated
contact schedule that you can apply to an account in one
step. You can prompt for a start date, delete pending
contacts, set access rights controlling who can run the
plan, and access the Event form to define the contact
plan's actions.
Contact Plan
Each Event in the Contact Plan schedules a Contact to
perform a particular action on an account. These actions are
grouped together into a sequence that makes up the contact
plan. The sequence of actions may be as simple as a single
contact to write a note to a debtor's Notes. Or, it may be
as complex as you need, with many Events occurring in the
plan, including other contact plans run from within the plan.
Conditions may be set to determine when any particular
Event occurs.
Anything that you can perform in a contact plan, you can
also perform manually in Collect! So please, try out your
steps manually until you are comfortable with them. It is
even helpful to draw out a flowchart of events so that you
really know what you want to happen at any given point
in your sequence of actions. This gives you ultimate control
over the automation process. Please be aware also, that
the order of events in a contact plan affects the plan's behavior.
Contact plans are run by selecting the Action
button on the Debtor's form, or typing the contact plan
code in the field just to the left of the Action button. You
can run a contact plan on many accounts at once using
Batch Processing.
You can also run a contact plan when you post a transaction,
run an import, post payments, or close an account.
Code
Each plan must have a unique Code. The Code is typed into
the Action field on the Debtor's form to invoke the
plan. It may also be chosen from the list of contact
plans. Anywhere in Collect! that a contact plan is
chosen, this Code will be used by Collect! to run
the contact plan.
Try to use a Code that helps to identify what the
contact plan does. For example, contact plan
that schedules a call for tomorrow (one day)
could have a code C1. A review 14 days from
today could be R14.
The Demonstration database has example
contact plans that you can try out. For instance,
there is a NEW contact plan used to assign a
Letter, and a Review in 10 days. This plan is
typically run on newly listed accounts.

Description
The Description field is a brief description of
the contact plan. This description is displayed
in the list of contact plans. You should try to
use a description to help you recognize what
the plan does.
Prompt For Start Date
Switch ON 'Prompt for start date' if you want
Collect! to prompt you for a Start Date when you
run the contact plan.
When this switch is OFF, all date references
within the contact plan are relative to the
current date, when the plan is run. This means
that a letter scheduled with a 1 day Delay
will be printed in tomorrow's print batch,
and a phone call scheduled for 10 days Delay
will appear in your WIP List in 10 days.
When you turn this switch ON, all events in
the plan will be scheduled with reference to the
date you enter. This means that a letter
scheduled with a 1 day Delay will be printed
one day after the date you enter, and a phone
call scheduled for 10 days Delay will appear in
your WIP List 10 days after the date you enter.
If you want your entered reference date to apply
to all the events in a contact plan, you will need
to make sure every event has at least a 1 day
Delay. If an event has 'Schedule immediately'
chosen, it is done immediately, regardless of the
reference date you choose.
 If you run a batch process with this
switch ON, Collect! will prompt you
only once at the start of the batch.
The Start Date you select will be
applied to the whole batch.
If you run a batch process with this
switch ON, Collect! will prompt you
only once at the start of the batch.
The Start Date you select will be
applied to the whole batch.
Delete All Pending Contacts
Switch ON 'Delete all pending contacts' if you want all
pending contacts in the debtor's contact schedule to
be deleted when the contact plan is run.
 WARNING: Only switch this ON if you are
sure you want to Delete all pending
contacts. If there is any doubt, leave
it OFF, or be sure to switch ON 'Prompt
before deleting' described below.
WARNING: Only switch this ON if you are
sure you want to Delete all pending
contacts. If there is any doubt, leave
it OFF, or be sure to switch ON 'Prompt
before deleting' described below.
Switch this OFF to leave any pending contacts in the
debtor's contact schedule intact. When you run the
plan, new contact events will be scheduled for the
debtor, but existing ones will be left in place.
To toggle the switch, press the Spacebar or
click your left mouse button on the field.
TO CONTROL WHICH EVENT TYPES ARE DELETED
You may control exactly which event types are deleted,
rather than deleting all pending events. Turn this switch
Switch this OFF and switch ON 'Delete same type contacts'
in the Event form, just for the event types that you want
deleted.
CONTACT PLANS THAT CALL OTHER PLANS
This switch has no effect when the contact plan is called
as a sub-plan of another contact plan. The switch is only
operative on the primary contact plan executed. If you
have a contact plan that calls other sub-contact plans,
the switch will have no effect when set on the sub-contact
plans, but will work when set on the primary plan.
PROMISES
Scheduled Promise contacts that are 'No Repeat' or have
the 'Create Copy on Repeat' switch checked will delete
normally. Scheduled Promise contacts that are have a
'Repeat' set, but don't have the 'Create Copy on Repeat'
will be marked done instead of deleted to maintain the
promise integrity.
CREDIT BUREAU REPORTING
Scheduled Metro contacts for reporting to credit bureaus
are not deleted regardless of this switch setting.
 If the Contact Event has 'No Autodelete' selected,
Collect! will not delete the contact.
If the Contact Event has 'No Autodelete' selected,
Collect! will not delete the contact.
Prompt Before Deleting
Switch ON 'Prompt before deleting' if you want Collect!
to prompt you before deleting pending contacts. You will
be asked if you are sure when the plan is run. A list of
pending contacts will be displayed for you.
With this switch OFF, and 'Delete all pending contacts'
switched ON, all pending contacts will automatically
be deleted when the plan is run.
It is a good idea to switch ON 'Prompt before deleting'
if you have any doubt about which pending contacts
are being deleted.
Don't turn this switch ON if you plan to
run this contact plan in a batch.
Do Not Run On Closed Debtors
Switch this ON with a check mark to prevent this plan
from running on any debtor with Mode CLOSED. When
Closed debtors are encountered in a batch process
running this contact plan, they will be skipped and the
file numbers will be logged to the Collect! Application Log.
Allow All Users To Delete
Switch this ON with a check mark if you want to ensure
that all pending contacts are deleted no matter who runs
this contact plan.
WARNING: Careful! Switching this ON overrides
access rights. This means ANY user level who
runs this plan will delete all pending contacts on
the account, even if their access rights level does
not allow editing or deleting contacts.
Sub-Plan
Switch this ON with a check mark if this plan is called
by another plan and is not to be executed on its own.
When this switch is enabled, this plan will not show up
in the list of contact plans that the end user sees when
the ACTION button is selected. This ensures that your
sub-plans will not be selected accidentally and run
by themselves.
There are several setup areas where you
can still select a plan that is a sub-plan. For
instance, in the Transaction Type form. This
gives you, as an administrator, flexibility for
calling these plans as needed, while
ensuring that your users will not run them
accidentally.
Events
The Events sub window displays the events in the contact
plan and allows you to create new ones. To activate the
Event sub window, click into it, or press F5. If this is a new
contact plan and there are no events showing in the list, you
will be prompted to create one. Select YES. If there are
events showing in the list of an existing plan, you may
select an Event to view, or press F3 to create a new one.
Each Event in a contact plan is fully defined in the Event form.
You can define letters, phone calls, file reviews, status
changes, promises, post Transactions, write Notes to the
Debtor record, or make one or more changes to a Debtor
record. You can activate or close an account, assign
accounts to an Operator, set a Commission rate or plan.
You can even cause another contact plan to be executed
on some future date.
Events can be scheduled to occur on certain dates. You can
set the number of Days delay before an Event in the contact
plan occurs. For example, you could schedule Letter 1 to
be sent today, and Letter 2 to be sent in 10 days, based on
a condition you set.
Please turn off the Contact Plan Cache before
editing your Contact plans. Change this setting
through the System Administration menu, Setup
and Configuration, Plans and Reference Tables,
WIP Options.
Security
Select this button to open the Contact Plan Access Rights
form where you can select user levels who will be allowed
access to this contact plan.
Delete
This button is visible only on the list of all contact plans.
Select this to delete the highlighted item from the database.
Edit
This button is visible only on the list of all contact plans.
Select this to open and modify the highlighted item.
New
This button is visible only on the list of all contact plans.
Select this to open a new blank Contact Plan form.
Help
Select this button for help on the Contact Plan
form and links to related topics.
Cancel
Select this button to ignore any changes you may
have made and return to the previous form.
OK
Select this button to save any changes you have
made and return to the previous form.
<<
Select this button to view the previous contact plan
in the list.
>>
Select this button to view the next contact plan
in the list.
| 
Was this page helpful? Do you have any comments on this document? Can we make it better? If so how may we improve this page.
Please click this link to send us your comments: helpinfo@collect.org