How To Use The WIP List
When accessed, the WIP List will display all the accounts meeting the search criteria predefined by the settings and preferences.
To enter into the list, the Operator clicks the first file at the top of the list. Once the debtor is displayed, the Operator
then performs the work to be done on that individual account. Once the Operator has completed the work on the account
(i.e. made their call, documented their notes), they need to (a) finalize the Contact Event which brought them to this account
and (b) set up a new, future-dated event to re-insert the account back into the WIP schedule for the next occasion it is to
appear in their WIP list.
You will note that when an account is being accessed via an active WIP List, that there is a highlighted bar just above the
sub-file Tab area of the lower debtor screen. The text within the highlighted bar represents the work (aka Due) date and the
contents of the Description line of the contact event. The purpose of the highlighted bar is provide a fast-path method to the
collector to access the contact event being addressed so that they do not have to open the Contacts Tab and manually search
for it.
The collectors exit the current account and advance to the next account steps are:
- Click the highlighted bar containing the WIP event that brought you to the account.
- This will open the Contact which is In Progress that the Operator has now completed today's work on. Click the radio
button beside the word "Completed".
- Click the OK button in the lower right of the Contact window to close and save.
- Click the double arrow in the lower right corner of the Debtor screen just under the OK button.
- You will get a pop up entitled " Schedule Next Contact - New" if your site has checked ON the WIP Option "Always show next
contact when". We strongly recommend this setting to avoid operator error in forgetting to set their next work date.
Accounts without an In Progress contact event of the default types Review, Phone, Promise or Other do not appear
in a collector's WIP List. With the fresh "Schedule Next Contact - New" on the screen, complete the mandatory
fields of Type, next work Date, Priority (may be a pre-filled default), Operator ID and Description. The default Operator
will always be the assigned Operator on the account. Using the drop-down arrow, another Operator ID can be chosen, if
applicable. It is recommended to input a free-hand Description if the Type is Review, Other or Promise as a 'next step'
reminder to themselves. Optional parameters are Repeat cycle, Amount, Class (user-defined/free-form) and Time. Time
queuing is recommended for specific/as-needed accounts and NOT recommended to be used on EVERY account. This latter can
negatively impact a WIP List by creating an inescapable sub-WIP of timed calls, leaving other inventory on the desk
falling into backlog and unworked.
- Click the "Next>>" button in the lower right corner of the Contact window to migrate to a fresh account to be worked.
- Click the ">>" in the lower right corner of the Debtor window and just beneath the OK button to receive your next account
from your WIP List.
 If you have more than one In Progress event that met your WIP loading options, you may be presented with another
Contact event to be completed for the same debtor. Simply repeat the completion steps from above and click ">>" again.
If you have more than one In Progress event that met your WIP loading options, you may be presented with another
Contact event to be completed for the same debtor. Simply repeat the completion steps from above and click ">>" again.
WIP List And Mode
The system default for WIP lists is that ONLY Mode Active accounts will be selected. This is so that PIF/SIF/BAN etc accounts
are not presenting to collectors if there remains any In Progress contacts still on the account at the time it was closed.
This can be modified for specialized staff who may have reason to queue Mode Closed accounts creating an individual WIP default
for them that includes the WIP Option "Show all modes" being checked ON, then "Save as Default" for that Operator.

Contacts In The WIP List
Every item that is displayed in the WIP List is actually a Contact scheduled for the Debtor with a Due Date and a Type.
The Type and Due Date determine if and when a Contact appears in the WIP List.
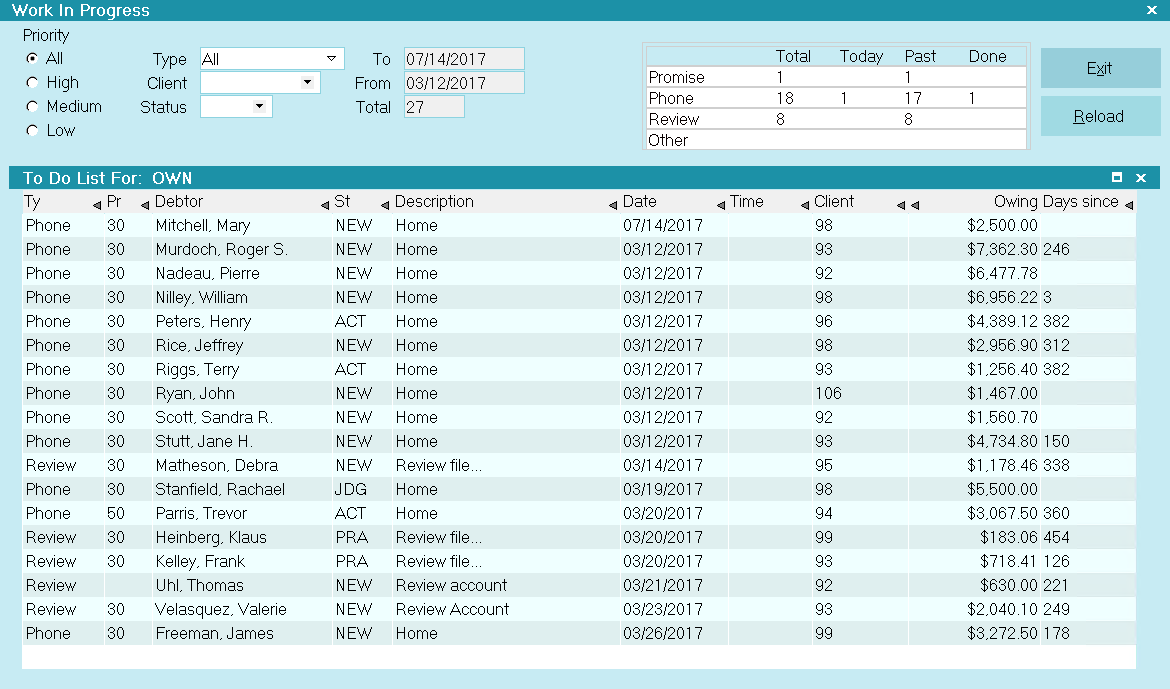
Work In Progress To Do List
Usually each Operator has their own WIP List. Contacts are generally assigned to the Operator who owns the Debtor account. Then
the contact is displayed in the WIP List for that particular operator. If you were to load the contacts for a different
operator, you would see all the contacts scheduled for that operator's accounts. It is possible to create Pool Desks by
utilizing the " Operator Group" function. This requires filling out the Group Tab for the Operators you wish to work a group WIP
list and checking the "Enable Operator Group". Each collector who is to have WIP List access to that desk needs to be defined
in the Operator list in this Group Tab.
Items in the WIP List are Contact Events, not accounts. When you work the contact and mark it done, it disappears from the WIP
List. It is important to always set up a new Contact with the next work date before leaving the account. This too can be
controlled and automated so that collectors are forced to ensure there is a fresh Contact before the WIP list will allow them
to exit the account. This is controlled by the "Always Show Next Contact When" switch located in the WIP Options list of
preferences that can be defined on a system-wide basis or on a per Operator basis with saved Default settings. See WIP Options
for more details.
If any of your contacts have a set time to notify you of an action, those contacts will always appear at the bottom of the list.
When it comes time to take action on the to do item, you will get a pop up on the screen to go to the account. If the contact
is also dated in the past, it will pop up each time you reload your to do list.
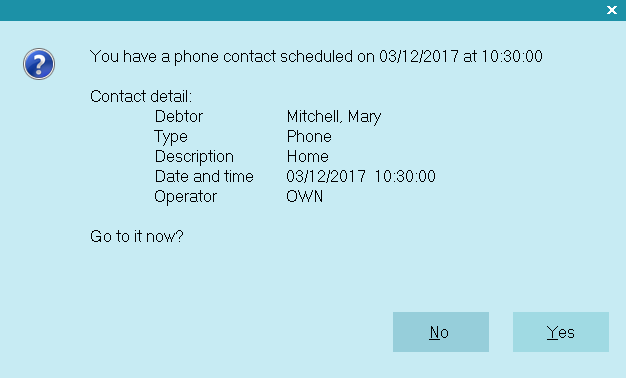
Timed Contact
If you select NO, you will get an option to ignore the contact. If you snooze your contacts, they will not pop up again until
the next time you reload your Work in Progress.
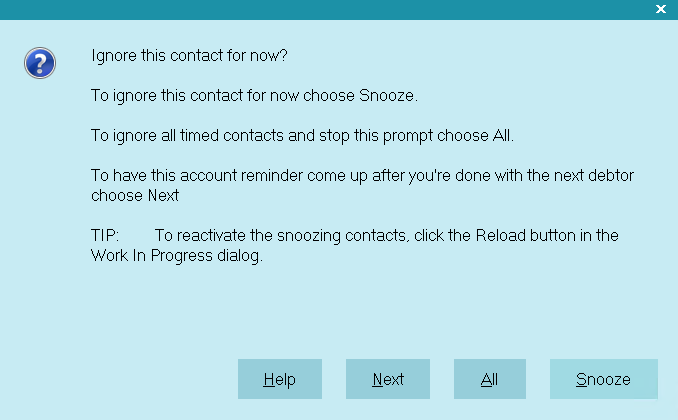
Timed Contact Ignore
Choosing A Way To View Your Contacts
The Work in Progress contains several settings which enable you to filter your Contacts or organize them.
Priority
Use this column to view your contacts according to order of priority. 99 is highest and 10 is lowest.
Select High and the To Do List will show you the Contacts with the highest priority.
How your site sets the conventions is completely an individual company choice. Some sites prefer lower numbers to reflect more
important tasks while others prefer the higher the number, the more important the task.
Additionally, you can have internal conventions like Regular ACT status with a regular Review is a Priority 50, a new account
on the desk has a Review with distinct Description (i.e. New Business) and is set with a level 99, and so on.
Type
The shipping default of the WIP Reload Filter is to load types Promises, Phone, Review and Other automatically when a WIP list
is displayed. These can by sorted by Type and sub-sorted by Priority and/or Description etc. on a per Operator basis.
Your company work plan strategies will determine the order of operations you want your collectors to be working their accounts.
There is an option in the WIP Filter screen to alternatively load All contact types which is user selectable. This would then
include event types such as Letter, Contact Plan, Change Status and other non-collection related events.
Client
This drop-down filter provides the ability to drill down for accounts specific to one client. In the event of an audit pending
or a focus blitz to elevate results for a key client, your collectors can sub-WIP so that events pertaining to a single client
may be concentrated on as needed.
Status
Choose a debtor Status if you want to filter the list by this parameter. This allows your collectors to sub-WIP dynamically as
per your company's workflow preferences: i.e. BPR/PBRs from yesterday, PRPs pending, then NEW, followed by ACT and SKP.
Sort Columns In The WIP List
Columns in the WIP list which are able to be sorted display with a small triangle on the extreme right side of the column
header label. Clicking on the triangle will invoke an ascending or descending sort order. Clicking the same triangle again will
reverse the order. Use of this feature is an effective means of sub-WIPing your list after primary filters have been chosen.
Reload
Operators may click RELOAD button to refresh their WIP lists as often as they wish. Management would use this function to view
different Operators' WIPs on demand for throughput and workstandard reviews of desk inventory.
WIP Options And Filters
There are a variety of software switches and features available to optimize the functionality of each Operator's WIP List.
Phone Contacts
If you have configured your softphone feature to allow direct dialing of a phone number by clicking on the phone icon beside
a phone number, you can check the WIP Option switch "Automatically display dialer" and the system will start dialing for you if
the contact you select is a Phone type contact Event.
Timezone
If you insert the field Timezone into your WIP display of columns being viewed, you can sort by this column to target accounts
in a timezone of interest. This is particularly useful where an office covers multiple timezones and is able to get in
prime-time evening calls in a debtor's timezone while it is still afternoon in their local timezone.
Force Feed Contacts
This switch in the WIP Options window enables you to set a forced order of operations to work accounts which the collector will
not be able to override by trying to select an individual account out from the middle of their day's WIP.
After checking the switch ON, you then choose from the 3 possible force orders:
- By Default will present the collector with contacts loaded with today's date at the top and work down to the oldest prior
date at the bottom, then proceeding to the bottom sequentially. As collectors use their >> arrow keys on the debtor screen
to advance to the next account in their WIPs, they will be presented automatically with the next account in the list. If
there are more than one account for the day, the load is sub-sorted by Priority from highest to lowest, followed by sort by
Name, followed by sort by Type. Timed accounts will appear at the bottom of the list and pop up to the Operator as the
times become due for their date. The collector must be in the act of exiting an account in their WIP in order for a timed
account to pop up.
- By Priority will load accounts from highest priority number to lowest and move sequentially to the lowest as the collector
uses the >> arrow keys on debtor screens to advance to the next account. If there are multiple accounts with the same
Priority, then they will Date order oldest to newest, followed by a Type sub-sort then Name sub-sort if there are multiple
accounts with the same Priority and Date. Timed accounts will appear at the bottom of the list and pop up to the Operator
as the times become due for their date. The collector must be in the act of exiting an account in their WIP in order for a
timed account to pop up.
- By Date will load accounts in a descending order of oldest at the top to newest towards the bottom and move sequentially to
the lowest as the collector uses the >> arrow keys on debtor screens to advance to the next account. If there are multiple
accounts with the same date, they will sub-sort next by Priority highest to lowest, followed by Type then by Name. Timed
accounts will appear at the bottom of the list and pop up to the Operator as the times become due for their date. The
collector must be in the act of exiting an account in their WIP in order for a timed account to pop up.
Pick a Date Range
From the Reload window, you can select "Search by range..." by clicking the radio button for this and 2 more date fields pop up
for entry of the From/To range of interest. This is used when a targeted next work date range is of interest.
An Operator must be in a WIP list in order to be presented with Timed accounts. If you are anywhere
else in the system (i.e. Browse list or other area of the software), Timed accounts do not pop up.
Orphaned Accounts
Ordinarily, when you work a contact, you mark it "Completed". You should always have at least one "In Progress" contact in one
of the WIP default types of Review, Phone, Promise or Other. In the absence of such an In Progress event, the account will
not pop up in an Operator's WIP list and will become "Orphaned". This means the account is sitting dormant on a collector's desk
but not being seen by the collector.
It is recommended to regularly run a utility report located via the menu path of "Tools\ Utilities\ Orphaned Account Search" to
find any such orphaned accounts and re-associate them with the collector's WIP list. You will be prompted to insert an In
Progress Review type Event that will appear in the collector's WIP with the Description of "Forgotten".
| 
Was this page helpful? Do you have any comments on this document? Can we make it better? If so how may we improve this page.
Please click this link to send us your comments: helpinfo@collect.org