Client
Set up your operations the best way right from the start, and
you'll minimize your frustration and enjoy using Collect!. This is
especially true when you enter Clients and their Debtors into your
working database. The right way to do this is to start from the Client
form.
Make sure you set up your Company Details, Dunning letters,
Operators, Transaction Types and a Contact Plan, if applicable,
before you begin to enter Client and Debtor information. If these
areas are taken care of first, all their settings and information are
readily available to you when you enter your clients and debtor
accounts.
The Client form shows Client information and the accounts listed
by the Client.
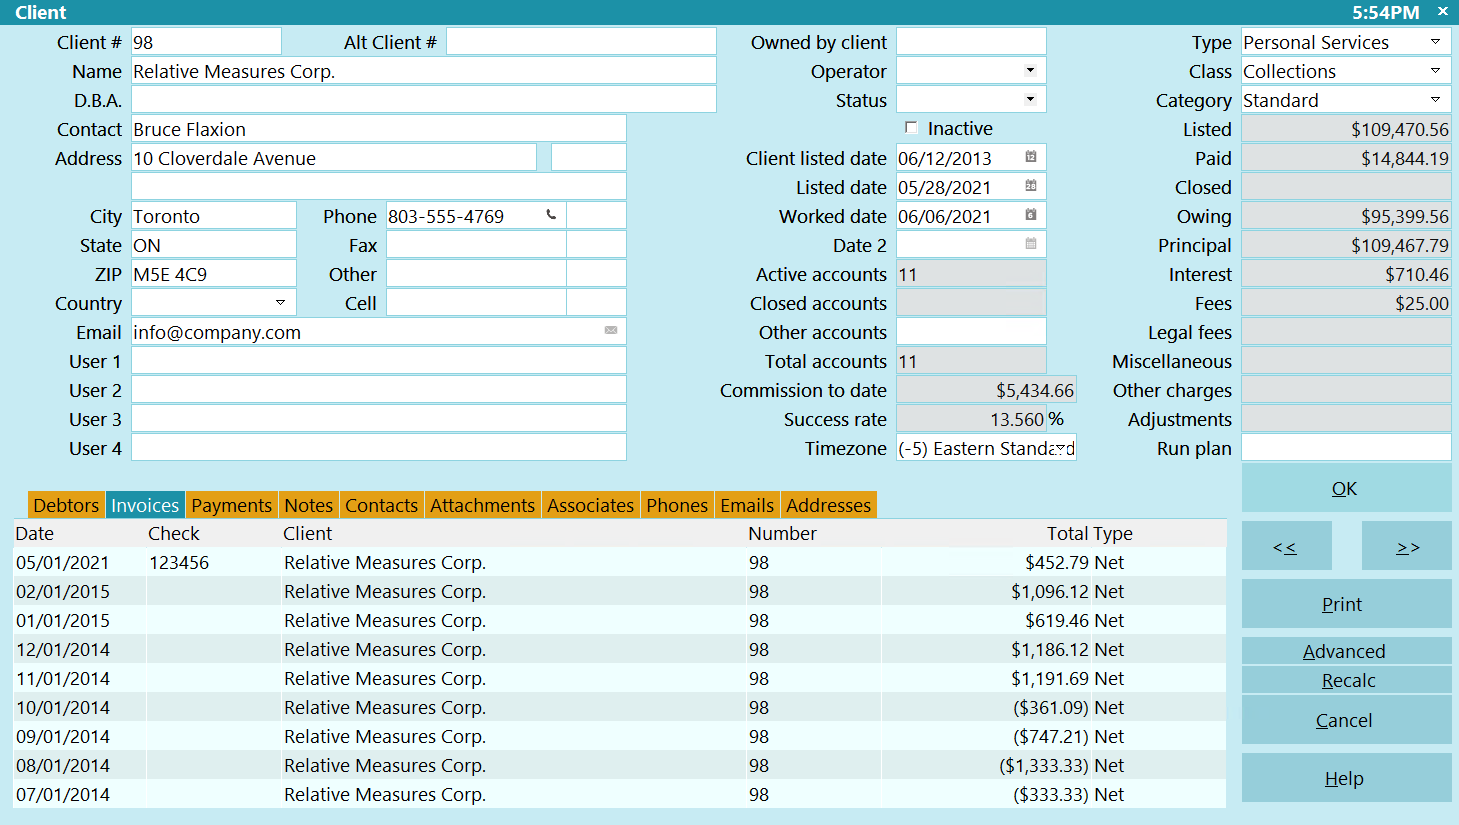
Client
Some of the information displayed on this form is Read Only.
These fields are grayed out and you cannot use the Client
form to alter this information.
Several tabs at the bottom of the Client form enable you
to access related information. All Debtors listed for this
Client are displayed by selecting the tab
labeled Debtors. This list includes
Debtors with both ACTIVE and CLOSED Modes.
Notes, associated parties, invoices, contacts, banks
and payments are also accessible through tabs on
the Client form.
*** IMPORTANT ***
The Client Settings form contains many settings that
will determine how Debtors, Payments, Invoices and
Credit Bureau Reporting are handled for this Client.
After you have entered your basic personal information for
this Client, select the ADVANCED button to open the
Client Settings form. It is very important to set up this
information correctly right from the start. The information you
set will be automatically entered into all related forms - Debtors,
Payments, Invoices and CBR. This will save a considerable
amount of time and reduce errors.
Client #
This is the Client ID number as assigned by Collect!.
This number may hold only digits and is used by
Collect! whenever the Client is referenced. If you have
another ID that you would like to use, please enter it in
the field labeled Alt Client #.
This field has additional functions when used with
Account Access Control and Operator Security.
This field is INDEXED.

Alt Client #
This field is for your own use. You may enter
an alternate Client Number to reference on reports.
Perhaps your Client has given you an alphanumeric
code to use. This field is indexed.
Owned By Client
This field is for your own use. You may enter the
Client Number for a "master" client. This enables you
to group client accounts for account security, for
auditing and for reporting.
The Browse Find By functionality is also tied to a
hierarchical client ownership system. This enables you
to set a Client # in this field that will then be used
when applying Account Access Control.
Clients and operators restricted to a particular Client # will
be able to freely search for records in your database.
However, they will only be able to find records within the
Client # or client ownership hierarchy to which they belong.
For instance, clients who own other clients will be able to
see all records in their hierarchical tree, but no others.
 You should not set the "Owned By Client" to
the same Client # as the Client itself. This
might cause details to be hidden erroneously
for accounts that should be visible to the
Operator. For example, Client #94 should not
have "94" entered in its "Owned By Client" field.
You should not set the "Owned By Client" to
the same Client # as the Client itself. This
might cause details to be hidden erroneously
for accounts that should be visible to the
Operator. For example, Client #94 should not
have "94" entered in its "Owned By Client" field.
This field has additional functions when used with
Account Access Control and Operator Security.
If you using the Client Group feature in Web Host, this
field will control which clients that the "master" client
can view. Please refer to Help topic,
How to Add a User to Web Host, for details.
Name
This is the actual name of the Client or company.
This field is indexed.
D.B.A.
This is an alternate name that you may use in reports.
Perhaps the Client has requested that you refer to
them with a pseudonym.
Contact
The name of the contact person or Representative
for this Client.
Address
First line of the mailing address of the company. All
invoices will be sent to this address, by default. This
is first line to begin typing the address.
Address 1
Second line of the mailing address of the company. All
invoices will be sent to this address, by default. This is
another line to type the address.
Street No
Use this field to enter a Street Number for the Client's
address.
City
Use this field to break out the City from the Client
address.
State
Use this field to break out the State from the Client
address.
ZIP
Use this field to break out the Postal Code from
the Client address.
Country
Use this field to break out the Country form the Client
address.
Phone
The phone number of the Client. Enter the phone number as
you would manually dial it.
 You can switch ON 'Only numerics in phone fields'
in Screens and Messages to remove any
non-numeric data from your phone fields.
You can switch ON 'Only numerics in phone fields'
in Screens and Messages to remove any
non-numeric data from your phone fields.
Phone Extension
The phone extension. Enter the extension as you
would manually dial it.
Fax
The fax number of the Client. Enter the fax number as you
would dial it manually.
You can switch ON 'Only numerics in phone fields'
in Screens and Messages to remove any
non-numeric data from your phone fields.
Fax Extension
The fax extension. Enter the extension as you
would manually dial it.
Other
Another phone number for the Client. Enter the phone number
as you would manually dial it.
You can switch ON 'Only numerics in phone fields'
in Screens and Messages to remove any
non-numeric data from your phone fields.
Other Extension
The other extension. Enter the extension as you
would manually dial it.
Cell
The cellular or other phone number of the Client. Enter the
number as you would dial it manually.
You can switch ON 'Only numerics in phone fields'
in Screens and Messages to remove any
non-numeric data from your phone fields.
Cell Extension
The cell extension. Enter the extension as you would
manually dial it.
Email
This is the Client's email address. Select the Email icon
to the right of this field to open the Send Mail window
which allows you to create an email and send it to the
Client.
User 1
This field is for your own definition and use. This field is indexed.
User 2
This field is for your own definition and use.
FOR CBR: If you are reporting to Credit Bureaus by client,
Trans Union codes go here. With the 'Report by Client'
feature, you can send CBR Settings specific clients
instead of your own. This is useful if you have a client
that wants you to report with their Credit Bureau Account
in addition to yours.
Please refer to How To Run A Credit Bureau Report for details.
User 3
This field is for your own definition and use.
FOR CBR: If you are reporting to Credit Bureaus by client,
Experian codes go here. With the 'Report by Client'
feature, you can send CBR Settings specific clients
instead of your own. This is useful if you have a client
that wants you to report with their Credit Bureau Account
in addition to yours.
Please refer to How To Run A Credit Bureau Report for details.
User 4
This field is for your own definition and use.
FOR CBR: If you are reporting to Credit Bureaus by client,
Equifax codes go here. With the 'Report by Client'
feature, you can send CBR Settings specific clients
instead of your own. This is useful if you have a client
that wants you to report with their Credit Bureau Account
in addition to yours.
Please refer to How To Run A Credit Bureau Report for details.
Operator
Select an Operator from the Operator pick list to
assign to this Client.
This field uses the same pick list as the
Debtor does for Operators. If you have
Operators who only work Clients,
simply add them to the list of
Operators.
Status
Select a Status from the Debtor Status code pick list
to apply to this Client.
This field uses the same pick list as the
Debtor does for Status Codes. If you
have codes that apply specifically to
your clients, simply add them to the list
of Debtor Status Codes.
Inactive
Switch this ON to mark a client as Inactive. Inactive clients
are excluded from client lists like the Debtor Client, Master,
Legal, and Forward fields.
Client Listed Date
When you enter a new Client in your system, Collect! fills
this field with the current date. You can modify this field
manually if desired, or use it to store the date you
entered the Client.
Listed Date
This field is updated whenever the Client is Recalculated.
It shows the most recent Listed Date found in the
debtors scanned.
Worked Date
This field is updated whenever the Client is Recalculated.
It shows the most recent Worked Date found in the
debtors scanned.
Date 2
This is a date field for your own definition and use.
Active Accounts
The number of debtors attached to this client
whose Mode is ACTIVE. This is a Read Only field
and may not be edited. The value is taken from
the Debtor forms.
Closed Accounts
The number of debtors attached to this client
whose Mode is CLOSED. This is a Read Only field
and may not be edited. The value is taken from
the Debtor forms.
Other Accounts
User defined field.
Total Accounts
The total number of debtors attached to this client.
This is a Read Only field and may not be edited.
Commission To Date
This field shows the total commission calculated on all
accounts for this client. You may need to recalculate
the Client to see a value in this field. The commission
amount will be updated whenever you recalculate the
Client.
If you want Collect! to calculate this total
from Payment type transactions only, then
switch ON 'Only payments for comm to date'
in the Client Settings form.
Success Rate
This is a percentage ratio of Paid to Listed accounts
and may be calculated using ALL accounts or only
CLOSED accounts, as set in Client Settings.
The success rate is calculated as
All Paid X 100 / All Listed
Where All Paid is the client's Paid field, All Listed is the
client's Listed Field, All Fees is the sum of all the Fees
fields of the client's debtors, and Adjustments is the
sum of all the Adj fields of the client's debtors.
Time Zone
This field holds a POSITIVE or NEGATIVE integer
indicating the Timezone of this Client.
Timezones are standard integer
values calculated from
GMT (Greenwich Mean Time).
When the timezone is not "Local Time,"
the title bar displays the Client's
current time.
The control file that manages Debtor timezones
is called setzone.ctf and is stored in your
"\Collect\masterdb\control" folder.
As of version Collect.6.2.1, control files
to set timezones for Associates/Other Parties
and record items stored in the Phone tab are
available for download from the Member Center.
They are DCsetzone.ctf and PHsetzone.ctf,
respectively. If you are not currently a Member,
contact Administration at 250-391-0466 option 3
for pricing.
Type
This field contains a pick list of choices that can be used
to classify your clients by Type.
FOR CBR: If you are using METRO 2 format, it is
required that you enter a valid "creditor
classification" in this field. The list of
choices given is a standard CBR list of
creditor classifications.
If you are not reporting to credit bureaus, this field is for your
own definition and use.
Click the arrow to see the default pick list
attached to this field.
FOR CBR: If the choice you need is not included in
the list, you can add it to the pick list.
Please check with your credit bureau to
ensure that it is a valid creditor classification
and let us know too, so we can add it to the
default list.
If you are not reporting to credit bureaus, you can add your
own entries to this pick list, as you choose.
Class
This field is for your own definition and use.
Click the arrow to see a default
pick list attached to this field.
You can use it or create your
own.
Category
A user defined category. This is used to indicate Client
records that represent third parties, such as other
agencies, attorneys or client prospects. You can add
additional types to this pick list.
Listed
The sum of the Principal and Original Interest fields
of all of the client's debtors. If the debtor has a
judgment, then the Judgment Balance and Interest
fields are used for the calculation instead, IF no
original principal is found.
Paid
The sum of the Paid fields of all of the client's debtors.
Closed
The sum of the Owing fields of all of the client's debtors
with Mode CLOSED.
Owing
The sum of the Owing fields of all of the client's debtors
with Mode ACTIVE.
Principal
The total dollar value of Principal for all
accounts listed by this Client.
Interest
The total dollar value of Interest for all
accounts listed by this Client.
Fees
The total dollar value of Fees for all
accounts listed by this Client.
Legal Fees
The total dollar value of Legal Fees for all
accounts listed by this Client.
Miscellaneous
The total dollar value of Misc Fees for all
accounts listed by this Client.
Other Charges
The total dollar value of Other Charges for all
accounts listed by this Client.
Adjustments
The total amount of adjustments to debtors belonging
to this Client.
Run Plan
Enter a Contact Plan to run on this Client. You can press
F2 to view the list of available plans.
This field uses the same pick list as the
Debtor does for Contact Plans. If you
have plans that apply specifically to
your clients, simply add them to the list
of Contact Plans.
Debtors
Select this tab to display the list of all debtors listed by
this Client. All Debtors with ACTIVE or CLOSED mode
are displayed. To enter a new debtor, select the NEW
button at the bottom of the window, or select YES when
prompted to create your first Debtor for this Client.
The new Debtor record will automatically
display the default settings for this Client,
such as Name, Client # and settings from
the Client Settings.
When in this list you may scroll through the Debtors
associated to this Client. Pressing enter or selecting
a highlighted line will bring the Debtor screen up for you.
Invoices
Select this tab to display the list of Invoice/Statements
generated for this Client.
When in this list you may scroll through the
Invoice/Statements for this Client. Pressing enter
or selecting a highlighted line will bring the
Invoice/Statement screen up for you.
Payments
Select this tab to display the list of Client Payments
attached to this Client. To enter a new payment,
select the NEW button at the bottom of the window,
or select YES when prompted to create your first
Client Payment.
When in this list you may scroll through the Payments
for this Client. Pressing enter or selecting a highlighted
line will bring the Client Payment screen up for you.
Notes
Select this tab to display this Client's notes or
add a new line.
Contacts
Select this tab to display this Client's contacts or add
a new one.
To enter a new contact, select the NEW button at the
bottom of the window, or select YES when prompted to
create your first Client Contact.
When in this list you may scroll through the Contacts
for this Client. Pressing enter or selecting a highlighted
line will bring up the Client Contact screen for you.
For help, press F1 when the Client Contact form is
displayed.
This tab is visible only if the Client
Management option is enabled in
Collect! Features.
Attachments
Select this tab to display this Client's attachments or add
a new one.
To create a new attachment, select the NEW button at the
bottom of the window, or select YES when prompted to
create your first Client Attachment.
When in this list you may scroll through the Attachments
for this Client. Pressing enter or selecting a highlighted
line will bring up the Client Attachment screen up for you.
For help, press F1 when the Client Attachment form is
displayed.
This tab is visible only if the Client
Management option is enabled in
Collect! Features.
OK
Selecting this button will save any information
you may have changed and return you to the
previous form.
<<
Selecting this button will take you to the previous
Client in the database.
>>
Selecting this button will take you to the next
Client in the database.
Recalc
Selecting this button will recalculate all the totals of this
Client's Debtors, payments and transactions, and will
recalculate the totals shown on this form.
When you create new Debtors through
the Debtor list, the Client totals are not
automatically adjusted. Click the Recalc
button to update the Client totals, or
choose Tools menu, Recalculate, and
recalculate Client totals to update all
Clients in the system.
Print
Selecting this button will take you to the reports list
where you can select a report to run on this Client.
Advanced
Selecting this button will take you to the Client Settings
form where you can add or edit data that will be used
when creating Debtors, payments, invoices and other
similar functions. This information can be used as
default data, automatically entered for you when you
create new Debtor records for this Client.
Cancel
Selecting this button will ignore any changes you have
made and return you to the previous form.
Help
Press this button for help on the Client form and
links to related topics.
| 
Was this page helpful? Do you have any comments on this document? Can we make it better? If so how may we improve this page.
Please click this link to send us your comments: helpinfo@collect.org