Web Host Action Plans
The Action Plan form is used to create an automated
contact schedule that you can apply to an account in one
step. You can delete pending contacts, set access rights
controlling who can run the plan, and access the Event
form to define the contact plan's actions.
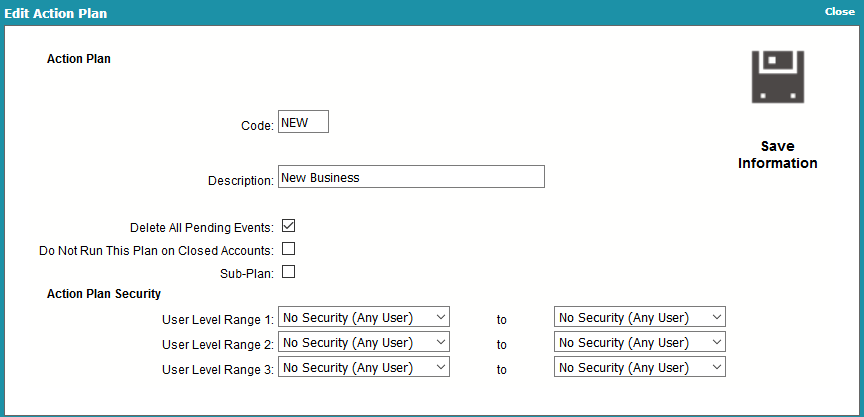
Edit Action Plan
Each Event in the Contact Plan schedules a Contact to
perform a particular action on an account. These actions are
grouped together into a sequence that makes up the contact
plan. The sequence of actions may be as simple as a single
contact to write a note to a debtor's Notes. Or, it may be
as complex as you need, with many Events occurring in the
plan, including other contact plans run from within the plan.
Conditions may be set to determine when any particular
Event occurs.
Anything that you can perform in a contact plan, you can
also perform manually in Collect! So please, try out your
steps manually until you are comfortable with them. It is
even helpful to draw out a flowchart of events so that you
really know what you want to happen at any given point
in your sequence of actions. This gives you ultimate control
over the automation process. Please be aware also, that
the order of events in a contact plan affects the plan's behavior.
Contact plans are run by selecting the Action
button on the Debtor's form, or typing the contact plan
code in the field just to the left of the Action button. You
can run a contact plan on many accounts at once using
Batch Processing.
You can also run a contact plan when you post a transaction,
run an import, post payments, or close an account.
Code
The Code field holds up to 7 alpha-numeric
characters identifying the contact plan. Each plan
must have a unique Code. The Code is typed into
the Action field on the Debtor's form to invoke the
plan. It may also be chosen from the list of contact
plans. Anywhere in Collect! that a contact plan is
chosen, this Code will be used by Collect! to run
the contact plan.
Try to use a Code that helps to identify what the
contact plan does. For example, contact plan
that schedules a call for tomorrow (one day)
could have a code C1. A review 14 days from
today could be R14.
The Demonstration database has example
contact plans that you can try out. For instance,
there is a NEW contact plan used to assign a
Letter, and a Review in 10 days. This plan is
typically run on newly listed accounts.

Description
The Description field is a brief description of
the contact plan. This description is displayed
in the list of contact plans. You should try to
use a description to help you recognize what
the plan does.
Delete All Pending Contacts
Switch ON 'Delete all pending contacts' if you want all
pending contacts in the debtor's contact schedule to
be deleted when the contact plan is run.
 WARNING: Only switch this ON if you are
sure you want to Delete all pending
contacts. If there is any doubt, leave
it OFF, or be sure to switch ON 'Prompt
before deleting' described below.
WARNING: Only switch this ON if you are
sure you want to Delete all pending
contacts. If there is any doubt, leave
it OFF, or be sure to switch ON 'Prompt
before deleting' described below.
Switch this OFF to leave any pending contacts in the
debtor's contact schedule intact. When you run the
plan, new contact events will be scheduled for the
debtor, but existing ones will be left in place.
To toggle the switch, press the Spacebar or
click your left mouse button on the field.
TO CONTROL WHICH EVENT TYPES ARE DELETED
You may control exactly which event types are deleted,
rather than deleting all pending events. Turn this switch
Switch this OFF and switch ON 'Delete same type contacts'
in the Event form, just for the event types that you want
deleted.
CONTACT PLANS THAT CALL OTHER PLANS
This switch has no effect when the contact plan is called
as a sub-plan of another contact plan. The switch is only
operative on the primary contact plan executed. If you
have a contact plan that calls other sub-contact plans,
the switch will have no effect when set on the sub-contact
plans, but will work when set on the primary plan.
PROMISES
Scheduled Promise contacts that are 'No Repeat' or have
the 'Create Copy on Repeat' switch checked will delete
normally. Scheduled Promise contacts that are have a
'Repeat' set, but don't have the 'Create Copy on Repeat'
will be marked done instead of deleted to maintain the
promise integrity.
CREDIT BUREAU REPORTING
Scheduled Metro contacts for reporting to credit bureaus
are not deleted regardless of this switch setting.
 If the Contact Event has 'No Autodelete' selected,
Collect! will not delete the contact.
If the Contact Event has 'No Autodelete' selected,
Collect! will not delete the contact.
Do Not Run On Closed Debtors
Switch this ON with a check mark to prevent this plan
from running on any debtor with Mode CLOSED. When
Closed debtors are encountered in a batch process
running this contact plan, they will be skipped and the
file numbers will be logged to the Collect! Application Log.
Sub-Plan
Switch this ON with a check mark if this plan is called
by another plan and is not to be executed on its own.
When this switch is enabled, this plan will not show up
in the list of contact plans that the end user sees when
the ACTION button is selected. This ensures that your
sub-plans will not be selected accidentally and run
by themselves.
There are several setup areas where you
can still select a plan that is a sub-plan. For
instance, in the Transaction Type form. This
gives you, as an administrator, flexibility for
calling these plans as needed, while
ensuring that your users will not run them
accidentally.
Contact Plan Access Rights allow you to restrict
access to a contact plan to certain User Levels
by entering range values. User Levels within each
range are granted access to the given plan.
When you set these rights, only user levels with
access to the plan will be able to view the contact
plan or run it. The plan will be invisible and inaccessible
to user levels with no access.
Collect! enables you to set up to 3 ranges of Users per
Contact plan. A User level within any of the selected
ranges will have access to the Contact Plan. Otherwise,
they won't be able to run the plan.
Range 1
Select the User Level range to allow to run the plan.
Range 2
Select the User Level range to allow to run the plan.
Range 3
Select the User Level range to allow to run the plan.
The Event form is used to define actions executed
when a contact plan runs. Each Event in a contact plan
schedules a contact with the settings you choose in the
Event form. The Event form displays fields and pick lists
for all the possible settings, allowing you to create any
type of contact.
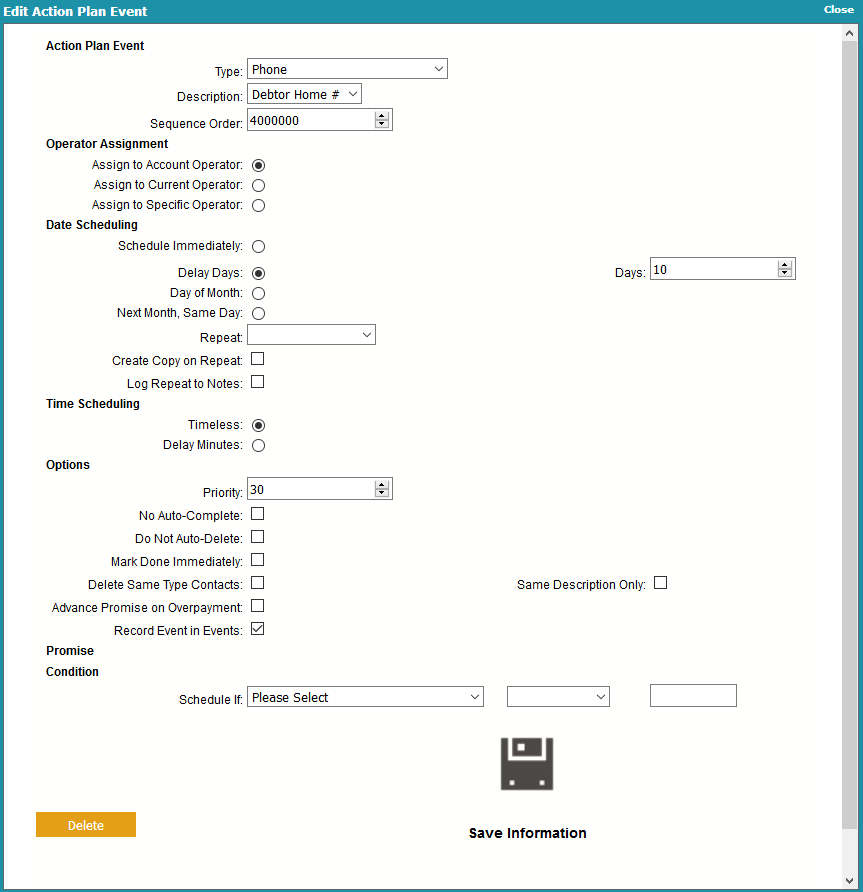
Edit Action Plan Event
You can define letters, phone calls, file reviews, status
changes, promises, post transactions, write notes to the
Debtor record, or make one or more changes to a Debtor
record. You can activate or close an account, assign
accounts to an operator, set a commission rate or plan.
You can even cause another contact plan to be executed
on some future date.
Events can be scheduled to occur on certain dates.
You can set the number of days delay before an Event
in the contact plan occurs. For example, you could
schedule Letter 1 to be sent today, and Letter 2 to be
sent in 10 days, based on a condition you set.
The Event form is accessed through the Contact Plan form.
To activate the Event sub window, click into
the Event sub window.
Type
The Type field sets the type of contact Event that you
are scheduling.
The Type of event determines a general action. For
instance, Letter means print a letter, while Operator
means assign an Operator to the account. Other
settings on the Event form define the details, such as
which letter to print, or which Operator to assign to the
account.
Click here
for a description of each type.
Event Types
There are several kinds of events, one for each type of
contact in the system.
Basically, Event Types fall into two groups:
Operator Assisted Contacts, such as
phone calls, requiring Operator intervention. These
will appear in the Operator's Work In Progress
To Do List.
Automatic Contacts, such as letters, which are
automatically processed by Collect! in batches.
Please refer to the Help topic Contact for
details about entering settings for of the many
types of events.
Description
The Description field defines the details of the Event.
The functionality of the Description field changes
depending on the Type of Event that is chosen. For
example, if you schedule a Letter Event, the
Description field becomes a pick list where you can
choose the letter you want printed from the list of
all reports in the system. For a Note Event,
you type the actual text that you want written to the
debtor's Notes into the Description field.
Please refer to each Event Type for details about
what to enter in the Description field for that type
of Event.
Sequence Order
Collect! executes contact plans in a particular order.
Click here
for a description of how contact plans execute events.
You can use the plan type and sequence order field
to control the order in which your events will
execute should you have multiple events set to
'Schedule Immediately.'
Assign To Account Operator
Switch ON Assign to Account Operator if you
want this Event to be scheduled for the operator
who is assigned to the debtor. When the plan
is run on an account, the Operator ID from the
Debtor form is entered automatically into the
contact's Collector field. The contact will show
up in the account operator's WIP To Do List.
To switch this ON, select the radio button
next to this field to place a dot in it.
Assign To Current Operator
Switch ON Assign to Current Operator if you
want this Event to be scheduled for the operator
who is currently signed on. When the plan
is run on an account, the Operator ID of the
operator who is signed on is entered automatically
into the contact's Collector field. The contact will
show up in the current operator's WIP To Do List.
To switch this ON, select the radio button
next to this field to place a dot in it.
Assign To Specific Operator
Switch ON Assign to Specific Operator if you
want this Event to be scheduled for an operator
of your choice. When the plan is run on an
account, the Operator ID of the operator you
selected is entered automatically into the contact's
Collector field. The contact will show up in that
specific operator's WIP To Do List.
To switch this ON, select the radio button
next to this field to place a dot in it. The Operator
field will appear.
Operator
The Operator field is visible only when you
switch ON 'Assign to specific operator'.
Schedule Immediately
Switch ON 'Schedule immediately' to schedule the
Event as soon as you run the plan. The effect of this
depends on the Type of event. For example, if you
are scheduling a Review, the contact is created
right away for today's date. For a Transaction, the
Transaction is posted immediately. For a Plan within
the plan, the second plan is run immediately. For
Note, the debtor's Notes are written to immediately.
To switch this ON, select the radio button
next to this field to place a dot in it.
Delay Days
Switch ON 'Delay days' to schedule the Event to
occur a given number of days after the contact
plan is run. For example, if you enter a 7 day
delay, when the batch process is run on the
following Monday, the contact Event will occur.
To switch this ON, select the radio button
next to this field to place a dot in it. This will
make the 'Days' field visible. There you can
enter the number of days to delay the
Event.
You can further control this by switching ON 'Prompt
for start date' on the Contact Plan form. Then
the user will be prompted when the plan is run.
The date the user enters will be used as a reference
date. In the example above, the contact would
occur 7 days from the date entered by the user
when the plan is run.
Days
Enter the number of days to delay the Event, for
example, 30. This field is visible only when 'Delay days'
is enabled.
Day Of Month
Switch ON 'Day of month' to schedule the Event
for a particular day of the month. For example,
if you enter 15 as the day of the month, when the
batch process is run on the 15th of the month,
the contact Event will occur.
If the current date is after the 15th already, then
the Event is scheduled for the 15th of next month.
Since this is an absolute day of the month, it will
not be affected by setting the 'Prompt for start
date' for the contact plan.
To switch this ON, select the radio button next to
this field to place a dot in it. This will make
the 'DOM' field visible. There you can enter the day
of the month you want the Event to occur.
Day Of The Month
Enter the day of the month you want the Event
to occur. This field is visible only when 'Day of month'
is enabled.
Next Month Same Day
Switch ON 'Next month same day' to schedule the
Event for next month on the same day of the month
that the plan is run. For example, if you run the
plan on the 15th of November, when you run your
batch process on the 15th of December, the contact
Event will occur.
This is actually a very powerful control. Imagine a
contact plan with a Plan Event that calls the same
contact plan on the same day next month. This results
in a repeating contact plan. With conditional contact
scheduling as described below you can create a high
level of automation this way.
To switch this ON, select the radio button next to
this field to place a dot in it.
If a contact is scheduled to occur on
the 31st day of the month, and a month
does not have 31 days, the event will
occur on the last day of that month.
Repeat
The Repeat field allows you to automatically repeat
a contact Event. The repeat period is written to the
contact. Collect! reads it when the contact Event
occurs and forwards the contact to the next period.
This can be used, for example, to repeat printing a
letter or posting a promised payment. You can also
use conditional scheduling to determine whether or
not to process the Event. Repeat occurs when you
print a letter, post a promised payment or batch
process previously scheduled contacts.
Create Copy On Repeat
This field is visible only when there is a value in
the Repeat field.
Switch this ON with a check mark to create a completed
copy of the Contact every time it is forwarded. This
allows you to track a past history of the Contact.
Log Repeat To Notes
This field is visible only when there is a value in
the Repeat field.
Switch this ON with a check mark to write a line to the
debtor's Notes every time the Contact is forwarded.
The note is in the following format:
[Type] type contact [Description], due [Date] processed
by [Op ID]
This switch is referenced when Promises are forwarded,
when previously scheduled transactions are batched,
when letters are batch printed, or when contacts are
worked through the WIP List.
Timeless
This switch is ON by default. No specific time is
set for this Event.
To switch this ON, select the radio button
next to this field to place a dot in it.
Delay Minutes
Switch ON 'Delay' to schedule the Event to
occur after a given amount of time has passed.
For example, if you entered 1:00 in the time,
and you invoke this Contact Plan at 3:26:43 PM
or 15:26:43 hours, the resulting contact will be
scheduled for 4:26:43 PM or 16:26:43 hours.
We use a 24 hour clock.
To switch this ON, select the radio button
next to this field to place a dot in it. This will
make the 'Minutes' field visible. There you can
enter the number of minutes or hours to delay
the Event.
Minutes
Enter the number of minutes to delay the
Event. For example, 40 means 40 minutes,
while 1:00 means 60 minutes or 1 hour.
This field is visible only when 'Delay' is enabled.
The contact will be scheduled for the current
time when the plan is invoked, plus the number
of minutes specified here for delay.
Priority
The Priority field allows you to enter a priority
for this contact Event. Priority may be used to
organize your WIP List, or to alert an operator
to the importance of a particular contact. In
the WIP List you can easily display contacts
in order of priority.
Priority levels in the WIP List are as follows.
66 to 99 High
34 to 65 Medium
1 to 33 Low
No Autocomplete
In WIP Options of the Collect! desktop application,
the setting 'Automatically mark contacts done' can
be set so that Collect! marks
contacts as Done when they are worked from the
WIP List. To override this global setting for a
particular contact Event, switch ON 'No
Autocomplete'.
To switch this ON, select the check box next to
this field to place a check mark in it.
Do Not Autodelete
Switch ON 'Do not autodelete' to prevent auto-deletion
of this contact Event. This is useful for overriding events
in other contact plans with 'Delete pending contacts'
selected. There may be cases where you do not
want pending contacts of this type to be deleted
when one of your other contact plans is run.
To switch this ON, select the check box next to this field
to place a check mark in it.
This also affects behavior when an account is
closed manually. Contacts with "Do not
autodelete" switched ON are not deleted.
However, Promises and Transactions will
be marked done when accounts are closed,
regardless of this switch setting.
Mark Done Immediately
Switch ON 'Mark done immediately' to mark the contact
done immediately after it is created. This is used to
record an event in the debtor's history. For instance, you
might want to keep track of the fact that a phone
conversation was held on a particular day. The contact
will never appear in a WIP List.
To switch this ON, select the check box next to
this field to place a check mark in it.
Delete Same Type Contacts
Switch ON 'Delete same type contacts' to delete
any pending contacts of this same contact Type
when the plan is run. This is useful to prevent
mistakenly scheduling two same type contacts
for a debtor, or to update a certain contact to
the current date.
For example, if a debtor has a Phone contact
scheduled, you could create another Phone
contact when a Phone contact plan is run.
This might result in a second unintended phone
call to the Debtor. To make sure this doesn't
happen, switch on 'Delete same type contacts'
in your phone Event. When the plan is run, Collect!
checks the Debtor's scheduled contacts, and
any pending Phone contacts will be deleted
when the current one is scheduled.
To switch this ON, select the check box next to
this field to place a check mark in it.
Same Description Only
Switch ON 'Same description only' to limit the
pending contacts that are deleted when a plan
is run. Now the contact will only be deleted if the
Description in the existing contact is exactly
the same as the contact you are about to schedule.
This switch only works when 'Delete same type
contacts' is enabled. Same type contacts are
not deleted if the Description is not identical.
To switch this ON, select the check box next to
this field to place a check mark in it.
Advance Promise On Overpayment
When you create a Promise Event, you can switch
ON 'Advance promise on overpayment' to control
how Collect! manages promise overpayments. The
corresponding switch on the Promise Contact will be
set when the contact is scheduled.
This setting causes Collect! to consider overpayments
of promises as prepayments against future promises.
For instance, if a Debtor promises to pay $100 per
month, and actually makes a payment of $200, the
contact's Promise Date will move ahead two payment
periods when the transaction for $200 is posted.
If 'Advance promise on overpayment' is switched OFF,
the Promise Date moves ahead only one period
whenever an overpayment is posted.
To switch this ON, select the check box next to
this field to place a check mark in it.
Record Event History
Switch this ON if you want Collect! to create a contact on the
account when this event is executed. This is useful for recording
the event as history on the account for reporting purposes.
For example, you may want to change the account
Status using a contact plan. To record this event on
the account for tracking purposes, you would switch
ON 'Record event history' in the Status event. Or, you
may want to print a letter on an account without creating
a letter contact. In that case, you would switch
OFF 'Record event history' in the Letter event.
You can also switch this OFF to prohibit creating a contact,
provided you are scheduling the event to occur immediately.
If the check box is UNCHECKED, the event will occur but there
will be no Contact record on the account.
When scheduling events that do not occur
immediately, Collect! needs a contact to process
the event. Also, when scheduling Reviews, Phone
contacts and other events for your work queues,
Collect! needs a contact. In these cases where a
contact is necessary for your event to execute,
Collect! will switch ON Record Event History with
a Read Only check mark. This will ensure that a
contact is created as required.
Promise
This section is visible only when the Event Type is Promise.
Amount Of Owing
This field is visible only when the Event Type is Promise.
Select this to calculate the Promise percentage based
on the amount in the Debtor's Owing field.
Schedule If
The 'Schedule if' field is used for specifying a condition
to base this Event on. Select from the
list of available fields.
Comparison Operator
The 'If' field holds the condition that you are using
for your test.
Your choices are:
= Equal to
> Greater than
< Less than
<> Not equal to
.. Within a range
>= Greater than or equal to
<= Less than or equal to
Value 1
Enter the value that the 'Schedule if' field is compared
to. When the 'If' field has "Within a range" selected,
the 'Value 1' field is the minimum value of the range.
Value 2
Enter the maximum value that the 'Schedule if' field is
compared to. This field is visible only when the 'If' field
has "Within a range" selected.
| 
Was this page helpful? Do you have any comments on this document? Can we make it better? If so how may we improve this page.
Please click this link to send us your comments: helpinfo@collect.org