Screen And Messages
The Screen and Messages form allows you to set several
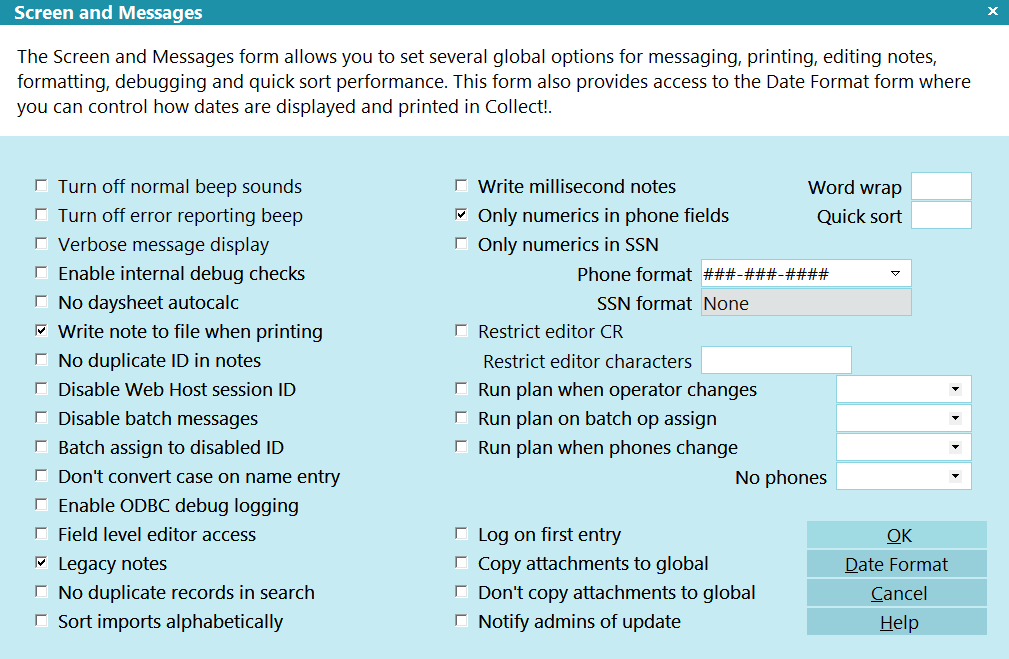
global options for messaging, printing, editing notes,
formatting, debugging and quick sort performance. This form
also provides access to the Date Format form where you can
control how dates are displayed and printed in Collect!.
Accessing Screen And Messages
Providing you have access to the various menus and
forms, you can access the Screen and Messages form in
the following way.
1. Using the menu bar at the top of Collect!,
select System to display the drop-down
menu. Select Preferences from
this menu and the System Setup menu will appear.
2. Select the Options, Sounds and Colors
button to display the Screen And Messages form.
Screen and Messages

Turn Off Normal Beep Sounds
This switch disables the beep sound used
for standard attention getting. Use the
spacebar to change this setting.
Turn Off Error Reporting Beep
This switch disables the beep sound used
when a system error or other important
system event is detected. Use the space
bar to change this setting.
Verbose Message Display
This option displays more messages to the screen when
Contacts are being scheduled.
Switch ON Verbose Message Display to write to the
Collect! Log when processing a batch. When you perform
batch operations, a completed log of Events and a list of file
numbers processed will be written to this file.
When this switch is ON, it affects performance speed.
You may want to turn it OFF until you need it for a
specific procedure.
 Messaging is largely controlled by the setting
in the Operator form (Normal, Advanced,
Expert.) The Verbose switch has been
structured to control contact scheduling
messages and to log batch processing
routines.
Messaging is largely controlled by the setting
in the Operator form (Normal, Advanced,
Expert.) The Verbose switch has been
structured to control contact scheduling
messages and to log batch processing
routines.
This switch should only be used temporarily
for very specific testing and debugging
processes. It should never be left on for
normal operations in Collect!.
By turning on 'Verbose message display'
and 'Enable internal debug checks', Collect! will
write detected printers to the Application Log
under DEBUG. This can be used to search for
other network printers which have not yet been
added to the local system registry.
Enable Internal Debug Checks
This option enables several internal checks as the
program is running.
1. Allocated memory is tested before and after use
to ensure the program never writes past the end of
an allocated block and does not attempt to use a
previously freed block of memory.
2. Network locking procedures are also checked to
report any potential areas of deadlock.
If you are experiences issues with Collect!, you can
switch this ON to help determine if the problem is
an internal system error.
This switch does adversely affect
performance. In general, this switch should
be turned OFF, and activated only when
problems are occurring.
This switch should only be used
temporarily for very specific testing and
debugging processes. It should never be left
on for normal operations in Collect!.
By turning on 'Verbose message display'
and 'Enable internal debug checks', Collect! will
write detected printers to the Application Log
under DEBUG. This can be used to search for
other network printers which have not yet been
added to the local system registry.
No Daysheet Autocalc
Normally (when this switch is OFF) Collect! automatically
recalculates a daysheet when you open the Daysheet form.
Turn this switch ON to stop the automatic recalculation.
You will need to select the Recalculate
button on the Daysheet form to
update its totals.
This switch is useful when you have a large number of
Contacts or listings on specific dates, and find the
recalculation of daysheets an exhaustive task.
Write Note To File When Printing
When you switch this ON with a check mark, Collect!
automatically writes a line, with a date and time stamp, to
the Debtor or Client notes when a letter is printed. This
works for any letter that is designated to 'Start On' Debtor,
Client, or Debtor Cosigner.
No Duplicate ID In Notes
Normally, when this switch is OFF, every time you
enter Debtor Notes, your ID and the current date
and time are written at the top of the notes.
When you switch this ON with a check mark, the
first time you enter the notes for an account, your
ID and the date and time are stamped into the notes.
However, when you enter notes a second time on
the same Debtor right away, that is, on the same
day and no one else has entered a note since
your last one, the ID and other information is
not loaded into the notes.
Disable Web Host Session ID
Switch this ON to disable the Session ID security
checking - useful when debugging Web Host.
Disable Batch Messages
Switch this ON to prohibit messages from popping
up during batch letter printing. This is important for
running a batch unattended, as a message popping up
would temporarily stop the printing process until you
respond to the message. Any messages will be written
to the Application Log instead when this switch is ON.
Batch Assign To Disabled ID
Switch this ON to let Collect! assign accounts to an
operator whose ID has been disabled. By default,
when the check box is NOT checked, Collect! will
display a prompt asking for confirmation from the user
prior to assigning accounts to a disabled operator.
They can select YES or NO to proceed.
Don't Convert Case On Name Entry
Switch this ON if you want Collect! to retain the
exact capitalization you have used when it
transposes the Debtor's Name into the Contact
field during data entry.
For example, "VanAllen, James" by default (with
setting unchecked) is transposed as James Vanallen.
With switch set, it is transposed as James VanAllen.
Enable ODBC Debug Logging
Switch this ON if you are attempting to debug your
ODBC Sync operations. This switch is only used
with ODBC Sync.
When this switch is ON, Collect! will generate
an "odbcsync.log" in your Collect\bin folder. This log
gives very specific information about Collect!'s attempts
to connect to the data source you specified. It also
includes the exact SQL command with details for each
account.
 This file will grow very large very fast! So it is
recommended that you only enable the
switch for short periods while debugging
a particular issue or when requested to do
so by Collect! Technical Services.
This file will grow very large very fast! So it is
recommended that you only enable the
switch for short periods while debugging
a particular issue or when requested to do
so by Collect! Technical Services.
Field Level Editor Access
Switch this ON with a check mark if you need to set
access rights on a per field basis for Text Editor windows.
With this switch enabled, when you set the access rights
for a field that uses the Text Editor to display data, the
Text Editor will take on the same access level that you
set for the field. So if you make a field Read Only, then
the file that you attach to that field will open in Read Only
mode in the Text Editor.
You can set access rights individually for Notes, Contact
Data and Attachment, Attachment File and any other fields
that use Collect!'s Text Editor to display contents.
Legacy Notes
Switch this ON to use background highlighting in the notes.
The color for the highlighting is based on the option set
in the ' Notes Color' field on the Operator Detail tab for
each operator.
If this is not switched on, Collect! will highlight the text
instead.
No Duplicate Records In Search
Switch this ON to only display one result per debtor.
For example, if you are searching for a phone number and the
number appears on the Debtor, a Cosigner, and the Phone Tab,
the result will appear in the list 3 times.
If this box is enabled, the same search will only display the
Debtor once for the phone search.
Sort Imports Alphabetically
Switch this ON to sort the import maps ( File Format Specification
record) alphabetically on the name field.
If left off, the maps will sort by rowid in the database.
Write Millisecond Notes
Switch this ON to include milliseconds in Debtor
Note lines. This enables Notes entered at virtually
the same time to sort correctly using a fixed-length
date/time stamp. Notes entered in quick succession,
by contact plans or imports, for example, will sort
correctly when this switch is enabled.
This works with Status Codes between 1 and 4
characters and Operator IDs between 1 and 6
characters. Extra spaces are padded to maintain
the fixed-length.
This switch is helpful for sorting notes lines
written to the Debtor through a batch process.
Many notes may be written in quick succession
and they will appear in the correct order in the
Debtor Notes.
Only Numerics In Phone Fields
Switch this ON with a check mark to strip non-numerics
from all phone fields as data is entered.
Whenever you leave any existing phone field, non-numerics
will be cleaned out of the phone number. Any phone data
you enter will be cleaned up immediately, as soon as
you leave any phone field.
Example:
(250) 345-4567 becomes 2503454567
This switch will also strip non-numerics from
phone fields filled during an import routine.
To strip non-numerics from all phone fields of
existing accounts, you can create an
import/export routine and use the option 'strip
non-numerics' for the phone field specifications.
For details, please refer to Help topic,
Import Field Options.
When doing a phone number search with this enabled,
Collect! will automatically strip the non-numeric
characters before searching the database.
 WARNING: Enabling this field does NOT alter the data in
your database. If you wish to use this feature,
you will have to remove all non-numeric values
from the applicable fields in the database in
order the the Find By functionality to work.
WARNING: Enabling this field does NOT alter the data in
your database. If you wish to use this feature,
you will have to remove all non-numeric values
from the applicable fields in the database in
order the the Find By functionality to work.
Only Numerics In SSN
Switch this ON with a check mark to strip non-numerics
from the SSN field as data is entered.
Whenever you leave an existing SSN field, non-numerics
will be cleaned out of the SSN. Any SSN data you enter
will be cleaned up immediately, as soon as you leave
the SSN field.
Example:
777-16-5972 becomes 777165972
This switch will also strip non-numerics from
SSN fields filled during an import routine.
To strip non-numerics from all SSN fields of
existing accounts, you can create an
import/export routine and use the option 'strip
non-numerics' for the SSN field specifications.
For details, please refer to Help topic,
Import Field Options.
When doing an SSN search with this enabled,
Collect! will automatically strip the non-numeric
characters before searching the database.
WARNING: Enabling this field does NOT alter the data in
your database. If you wish to use this feature,
you will have to remove all non-numeric values
from the applicable fields in the database in
order the the Find By functionality to work.
Phone Format
Select a format from the pick list to use a predefined format for
phone numbers. This only affects the display. The data in the database
will only store the numeric values.
Available Formats:
None
(###) ###-####
###-###-####
###.###.####
### ### ####
##-####-####
##.####.####
## #### ####
SSN Format
Select a format from the pick list to use a predefined format for
SSN numbers. This only affects the display. The data in the database
will only store the numeric values.
Available Formats:
None
###-##-####
###.##.####
### ## ####
###-###-###
###.###.###
### ### ###
This option only works when 'Only numerics in phone fields' is ON.
Restrict Editor Cr
Switch this ON with a check mark to prevent the Operator from
using the ENTER key, and/or pasting in a Carriage Return/Newline
from the clipboard when editing or creating Debtor or Client Notes.
This is only in effect, when you have set the operator's Notes to
Read Only or No Delete.
To set Notes, please open Access Rights
item, "notes," and set to Read Only.
It is recommended that you also restrict editor
characters used in the Date/Op Stamp to
prevent faking a Date stamp in Notes.
Restrict Editor Characters
Enter the characters that you wish to prohibit the
Operator from entering in Debtor or Client Notes.Switch
this ON with a check mark to prevent the Operator from
using the ENTER key, and/or pasting in a Carriage
Return/Newline from the clipboard.
This is only in effect, when you have set the operator's
Notes to Read Only or No Delete.
This also handles pasting from clipboard.
To set Notes, please open Access Rights
item, "notes," and set to Read Only.
It is recommended that you also restrict
editor characters used in the Date/Op
Stamp to prevent faking a Date stamp
in Notes.
Run Plan When Operator Changes
Select a contact plan to run when the Operator is
changed on the Debtor form. The plan you select will
run automatically whenever a user manually select a
different Operator. You can create any events that you
need in the Contact Plan you select.
Run Plan On Batch Op Assign
Select a contact plan to run when a batch process is
run to Assign Accounts to Operators. The plan you select
will run automatically on every account where the Operator
was changed by the batch process. You can create any
events that you need in the Contact Plan you select.
Run Plan When Phones Change
Select a contact plan to run when a Phone field is
changed on the Debtor form. The plan you select will
run automatically whenever a user manually updates
a Phone field. You can create any events that you need
in the Contact Plan you select.
No Phones
Select a contact plan to run when a Phone field is
emptied on the Debtor form, rendering all the phone
fields empty. This plan will run only if any remaining
phone numbers are emptied on this visit to the
Debtor. It will not run if you visit a Debtor with no
phones.
Log On First Entry
Switch this ON with a check mark to enable logging
on first entry when you have "Log to Notes" enabled
for any field on the Debtor, Client, or sub-records of
either of those records.
With this switch ON, Collect! will log changes to notes
even if the field was blank initially. Collect! will attempt
to disable this when you are creating a new records, such as
Debtors, Clients, or Transactions.
If the record is being modified on the same day it was
created, Collect! will only log the first entry if the record
is being modified by a different user from the one who
created the record.
With this switch OFF, Collect! will not log a field
change to notes if the field was initially blank.
Copy Attachments To Global
Switch this ON to disable the 'Do you want to copy
this file to the Global Folder' prompt that appears
when attaching a file to an attachment.
When enabled, Collect! will copy the file to the
applicable location in the global folder.
Don't Copy Attachments To Global
Switch this ON to disable the 'Do you want to copy
this file to the Global Folder' prompt that appears
when attaching a file to an attachment.
When enabled, Collect! will NOT copy the file to the
applicable location in the global folder. Collect! will
fill in the full file path to the location of the file.
WARNING: This option should only be used if you do not
want Collect! to manage your global folder and
the respective file attachments. This option
should also not be used if you normally attach
files from your local computer like the Desktop
folder. This option is designed for users who
manage their documents in a their own network
location.
This option is not to be used at the same time as
COPY ATTACHMENTS TO GLOBAL as the 2 options contradict
each other.
This option is for your own managed attachment file system
and is not related to the GLOBAL FILE ACCESS PATH field
on the DATABASE PREFERENCES form.
Notify Admins Of Update
Switch this ON to enable Collect! to check for updates.
When enabled, upon closing the application, Collect!
will invoke the Version Check function available under
the Help Menu.
If a new update is available, the user will be notified
and will be provided with the download button.
Clicking the download button will not close Collect!.
This functionality will only notify the User Levels
that Collect! considers to be administrators: 1, 10, & 99.
Word Wrap
Put a value in this field to set the column width
for editing reports printed to screen. When you
print a report to screen and make changes,
the text will word wrap at this column instead
of the screen width. In all other respects, the
editor remains unchanged.
Quick Sort
This is the maximum number of records loaded into
RAM when sorting debtors. It is set internally at 5000
records. If you have over 150,000 to 200,000 accounts
and you do a lot of searching and sorting, you may
want to set this number to 25000 to speed up the
sorting process.
Lists exceeding the Quick Sort Limit will be sorted
directly on disk. This is slower than the Quick Sort,
but can handle any number of records.
OK
Select this button to save any changes you
have made and return to the previous screen.
Date Format
Select this button to open the Date Format
form where you can edit the date format
and choose how you wish to display dates
throughout Collect!.
Cancel
Select this button to ignore any changes you
have made and return to the previous screen.
Help
Press this button for help on the
Screen and Messages form and
links to related topics.
| 
Was this page helpful? Do you have any comments on this document? Can we make it better? If so how may we improve this page.
Please click this link to send us your comments: helpinfo@collect.org